“He’s All Boy” Baby Cap Tutorial

by This is Carrie on July 5, 2021

Download the PDF pattern HERE. Size: 0-3 months

*for personal use only

Materials needed: 1 Large men’s flannel shirt, 1 soft knit t-shirt (lining) , 1 button, interfacing

You can also use new fabric:  1/3 yard for cap and a 18″x12″ piece for lining.

For a matching baby blanket made from flannel shirts tutorial, click HERE.

Once pattern pieces are printed out and part A & B of the cap band have been attached together, cut out all pieces as specified on each pattern piece.  If using a flannel shirt, all pieces can be cut out of the shirt front, leaving the shirt back for another project.

Cut out lining.  You can use a piece of solid or printed cotton or an old t-shirt.

Cut brim piece from interfacing as well. Pick a quality depending on the stiffness you’d like in your brim.

Once everything is cut, these are the pieces you should have (my lining pieces look mishapen because the knit fabric is rolling a bit).

Sew cap front piece, right sides together, along short, straight edge and press open.  Repeat on front cap lining piece.

Place an ease stitch around the back cap piece. One way to create an ease stitch is to set thread tension to a tighter level.

Stitch around back cap piece just shy of the 3/8″ seam allowance.  Thread tension should be enough to pull in fabric but should not high enough to gather it (there should be no tucking of the fabric at the stitch line, just rippling).  Repeat ease stitch on back cap lining piece.

When the cap back is properly “eased”, it should look like this.

Pin and sew cap back piece to cap front piece, right sides together. Ease stitch should help ease in extra fabric from cap back. Repeat for lining pieces.

If small tucks happen at seam, unpick and resew, taking care to ease in fabric with out gathers.

Prepare brim to be attached: to lessen bulk at seam, trim interfacing then iron onto wrong side of brim piece.

Placing right sides together, sew brim together along curved edge. Trim seam & notch to reduce bulk around curve.

Flip brim right side out and press.  If you’d like to add topstitching to the brim, now is the time to do it!

Prepare cap band to be attached: press in half along foldline.

Prepare strap to be attached: with right sides together, fold on foldline and sew along one short end and the long end leaving the other short end open to turn.

Trim cap strap seam and corners to reduce bulk.  Turn right side out and press.

Pin band and brim onto front edge of cap, matching all raw edges and using notches as guide.  Baste to hold in place.  The band will hang over the rounded edge of each side.

Once pieces are basted, trim off the extra band that extends beyond the curved edge.

Baste strap to left corner of cap, matching raw edges, using pattern mark as guide.

Now, you should have the cap lining and the cap ready to sew together.

With right sides together, pin cap lining to cap starting at mark at base of cap and ending at other mark at base of cap.

Leave the space between the two marks at the base of the cap open for turning.

Sew all around cap from mark to mark.  If you are using a knit lining, sew pieces together with lining side down. The feed dogs will help keep with knit from stretching while sewing

Trim seams and corners. Turn cap right side out.

Press under seam allowance on cap and lining at opening.

Edge stitch along entire bottom edge of cap to close the opening.  My blind stitch presser foot makes it easy to stay straight and right on the edge.

Press bottom edge of cap.

Based on the size button you’d like to use, sew a buttonhole at edge of strap.  You could even use a button off the front of the flannel shirt!  Scared of buttonholes? Check out Dana’s tutorial.  Or try Velcro!

Sew on button to right side of cap using pattern mark as guide.

Share

{ Comments on this entry are closed }

“He’s All Boy” Baby Blanket Tutorial

by This is Carrie on July 5, 2021

Download rounded corner pattern HERE.

Materials needed: 3 Large Men’s Flannel Shirts,  1 yd plain cotton (or lightweight cotton batting) & 1 yd Rose Swirl Minky Fabric.

For matching baby cap tutorial, click HERE.

Cut bias strips of fabric out of the back of each flannel shirt.  I cut 5″ strips out of two of the shirts and 2″ strips out of the third.

Cut a 30″ square of plain cotton fabric (or a lightweight cotton batting if you want a blanket with more weight).  Use the corner pattern to round all four corners.

Loosely arrange the stripes on top of your cut plain cotton rounded square to a pattern of your liking.  Strips will need to be pieced together to be big enough to cover the fabric base. You may need to cut more strips from you shirt using the sleeves of front.

Sew loose strips together as needed using either a clean seam or an overlapped, raw seam like in the picture. 

Lay a loose strips on base fabric, pin and sew one strip at a time.

Lay each strip on the blanket base, overlapping at least 1/2 the previous strip and sew.

Once all the strips have been sewn onto base, don’t worry about the base fabric puckering a little.  The bias cut strips will stretch and retract a little.

Cut off excess length of flannel strips to even up with blanket base.

Lay finished blanket top on top of minky fabric, WRONG sides together.  Measure backing 2 1/2″ larger around all sides of blanket front.

Cut out minky backing as marked.

Fold over backing 1″. Then fold over again 1 1/2″ onto blanket front, pinning into place.

At the rounded corners, fold over twice as on straight sides but place many little tucks into the minky and pin in place to make the corners .

Sew 1/2″ to 3/4″ from inside edge to catch backing and not just fur.  Sew around entire blanket.

You’re finished!  This pieced flannel shirt blanket will just get better and better with each wash as the raw edges soften up.

Paired with the “He’s All Boy Cap”, the blanket makes an excellent gift.

You can also use the same backing technique with a piece of solid fabric for the top.

Share

{ Comments on this entry are closed }

Tryptophan Trail Run

by This is Carrie on December 8, 2013

Image 4

Instead of Black Friday shopping, I opted for the Tryptophan Trail Run in Trabuco Canyon organized by Skyler of The Endurance Family.  From the moment I arrived, I could immediately tell I was way out of my league.  I might have been the only one in the gorup not talking about an upcoming ultra distance trail run.

IMG_7371

Even so, they let me tag along and we logged 15 miles and 3,700’+ of elevation gain in the rain.

IMG_7360

So glad I got to share this First Annual Trail Run tradition with my visiting niece (my running inspiration).

Share

{ Comments on this entry are closed }

Thanksgiving 10K 2013: Plymouth Rock ‘n Run

by This is Carrie on December 7, 2013

IMG_7345

Turkey Trots are just as important to our Thanksgiving tradition as Turkey.  Instead of dressing up turkey-like, the kids opted for Santa costumes and Sparkle Athletic skirts, shouting “Merry Thanksgiving!” to everyone around them.

Made with Repix (http://repix.it)

The three youngest did the Kids K while Princess ran the 5K with her friend at the slowest pace since she was 6 years old.  But they had fun skipping down the route handing out imaginary turkeys to the other runners, so that’s all that matters, right?

photo

At 3 years old, Baby Brother is an old pro at races, telling me “i’m going to go fast, you keep up”

IMG_7324

I do my best when I can latch onto someone running just outside my comfort zone and luckily I found that woman at mile 2. She was amazing and totally encouraging once she found out that I was pacing off her.  For the first time in a while, I pushed myself to the “puke point” right before the finish line. After my considerable break from running on a regular basis, it felt good and bad all at the same time.

It wasn’t a PR, but it felt good knowing I’m not starting at square one as I head into Boston Marathon training. Luckily my road biking and Hit the Mark Fitness BootCamp has sustained some level of fitness.

Time: 49:23
Pace: 7:57/M
Overall Place: 99/552
Age Group Place: 4/46

Share

{ Comments on this entry are closed }

mood designer fabrics crochet collar dress

Wool houndstooth suiting isn’t your typical Christmas dress fabric, but it’s going to be a cozy, houndstooth holiday for the girls this year.

photo 1-2

Check out the details of this vintage-inspired dress on the Mood Sewing Network blog.

photo 2-2

Find the instructions for this detachable crochet collar HERE.

Share

{ Comments on this entry are closed }

Making Stuff: Sweater Knit Dress {Mood Sewing Network}

by This is Carrie on December 5, 2013

photo 1-2

I’d never sewn with a sweater knit before but when I spotted this gorgeous, lightweight, italian wool sweater-knit at Mood Fabrics I decided it was time to give it a try.

V1315

During a Vogue pattern sale, I picked up this Rebecca Taylor pattern (V1315) (despite it’s awkward photo).

sketch copy copy

It was those amazing droopy pockets that got me.  I cut size 8 based on my measurements, but I wished I would have added more length in the bodice. Since I don’t sew for myself very often, I forget that I am long-waisted.  To see more pics of the finished product and the amazing neck detail, head over to the Mood Sewing Network blog.

Share

{ Comments on this entry are closed }

Making Stuff: Spider Bean Bag Toss Game {Lion Brand Yarn}

by This is Carrie on November 15, 2013

spider bean bag toss

I imagined and began this Spider Bean Bag Toss game over two years ago when I first got my hands on a pack of Lion Brand Bon Bons. I finally finished all the spiders just a few days before this last Halloween. Finally getting it up on the blog a couple months later which you can either consider too late for last Halloween, or amazingly early for next Halloween.

photo 4

Just in time for some pre-trick-or-treating festivities with the neighbors.photo 5

Supplies:

Scrap fabric at least 6″x12″  for each spider, 1 package of Lion Brand Yarn Cotton Bon Bons, googly eyes, spider web mat (fond mine in the dollar section of Target).

Download Spider Bean Bag pattern PDF HERE.

bon_bon_yarn

1.Cut 2 spider shapes out of each fabric

2. Cut 84 pieces of yarn 12″ long. Separate into 12 strands. braid 3 strands together, securing at each end.  I suggest cutting a piece of cardboard 12′ long and winding yarn around it then cutting at each end all at once.

3. Fold yarn legs in half and baste two pieces to each side of spider body creating four legs.

4. Sew spider body shapes right sides together from mark to mark leaving a hole.

5. Trim and turn

6. Fill with “bean” of choice. I like to use rice or lentils.

7. Hand sew hole closed

8. Glue on googly eyes.

photo 1

You’re probably going to be jealous of my spider mat which I found in the Target dollar section 2 years ago. I can’t believe how perfect it is for this little bean bag toss game.  A web could also be made out of posterboard or fabric.

*Pattern and tutorial for personal use only.

Share

{ Comments on this entry are closed }

Making Stuff: Baptism Dress {Mood Sewing Network Project}

by This is Carrie on October 26, 2013

baptism dress

Before I cut into my beautiful Anna Sui eyelet fabric from Mood Designer Fabrics, I knew I needed to test my self-made dress pattern.

printed dress

I didn’t want to make the sample dress from muslin…you know…just in case it turned out great. A piece of lightweight, printed cotton from the stash was just what I needed.

printed dress

I worked out a few kinks in the construction process and decided the bodice was a little too full.

printed dress
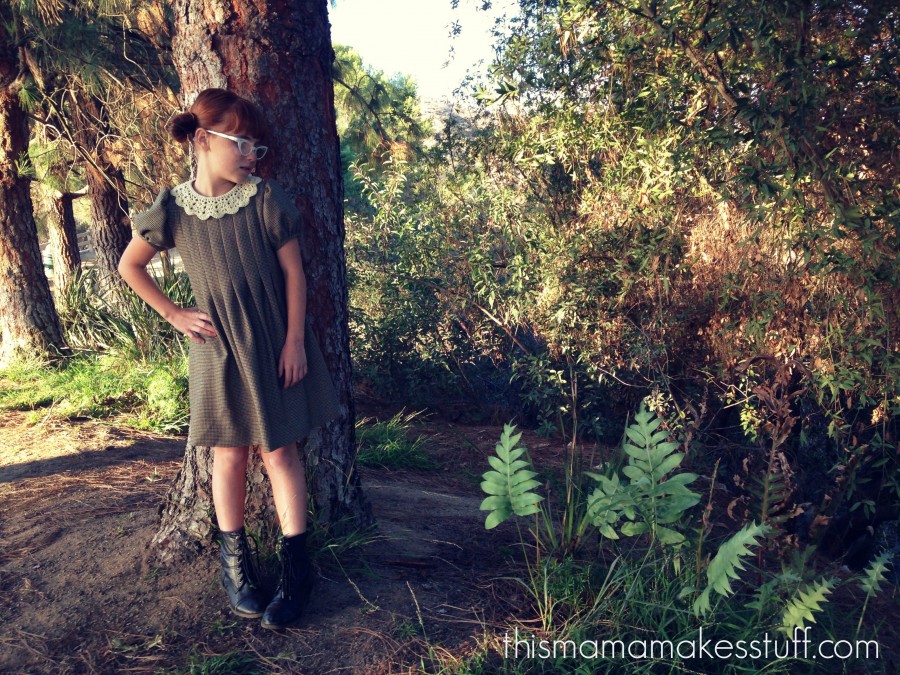
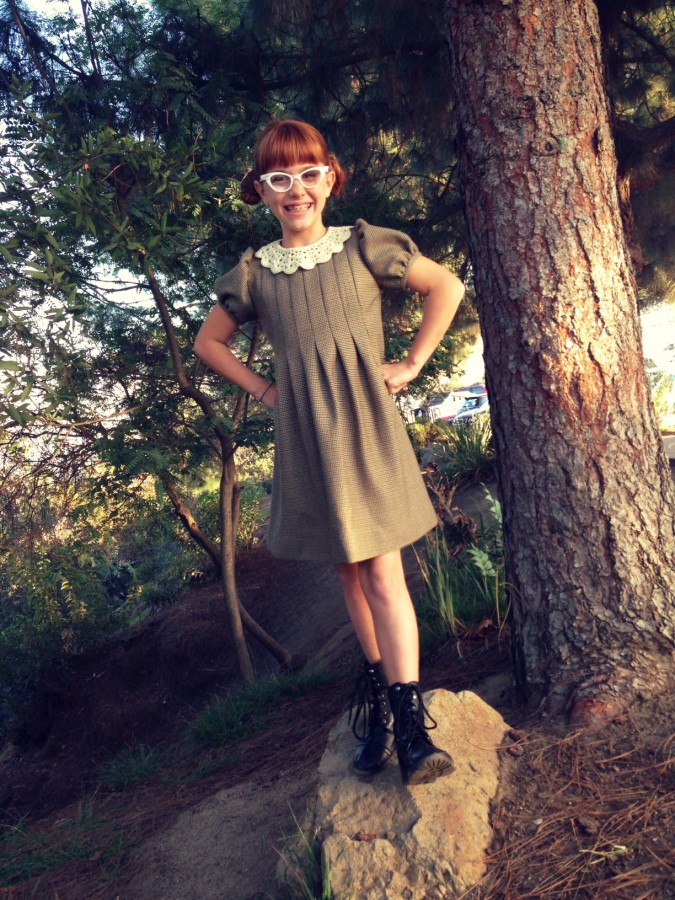
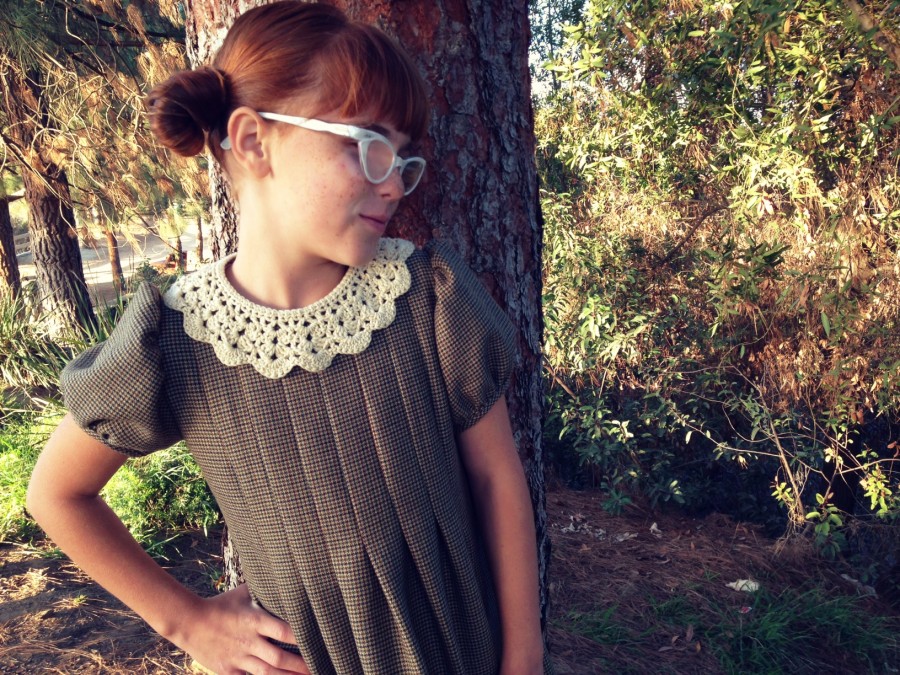
Making practice garments in something new to my sewing habits (I’ve been more of an instant gratification kind of sewer the past few years). But, each time, the practice has proven invaluable to creating a more perfect and less frustrating final piece. When you work with gorgeous fabrics, the extra time is worth the trouble before you cut into the good stuff.  You must check out the finished product over at the Mood Sewing Network blog: Anna Sui eyelet baptism dress.

Share

{ Comments on this entry are closed }

Making Stuff: Lace Printed Tank {Fabric Spray Paint}

by This is Carrie on October 24, 2013

Supplies:

Plain shirt,  Next Level Fabric Spray paint, lace yardage, temporary spray adhesive (optional).


Lay lace across shirt (to get a crisper image spray lace with spray adhesive before laying on shirt. Then spray with paint.

photo 1

Once dry, remove lace and repeat on the back of shirt.

photo 2

Enjoy your new shirt!

Share

{ Comments on this entry are closed }

Halloween at the Discovery Science Center

by This is Carrie on October 15, 2013

There’s no better time to visit the Discovery Science Center than the month of October when you can “explore pumpkins, learn about the phases of the moon, explore a spooky 3-D maze, check out spiders of all sizes and colors, and much more” at the Spooky Science exhibit.

There is nothing more spooky than getting up close and personal with tarantulas and black widow spiders.

The kids can get their “craft on” making googly-eyed jack-o-lanterns.

On the weekends, the little goblins can make slime, participate in a costume parade, and see special stage shows like “The Wizard of Ooze.”

You definitely don’t want to miss the 3-D maze.  It really is amazing!

Spooky Science isn’t the only featured exhibit at The Discovery Science Center right now. The Science of Ripley’s Believe it or Not has come to the center and will be staying until January 5, 2014.  The kids have been obsessed with the Ripley’s believe it or Not books for a few years now and have been dying to go to one of their many museums. 

This exhibit is a great, kid-friendly taste of Ripley’s “compendium of oddities, anomalies and fantastic feats” as well as the science behind the unbelievable collection.  With it’s many hands-on elements, I haven’t ever been to a museum exhibit that could entertain all four of my children (ages 2-11) at their own levels for an extended amount of time.

Make friends with a Megalodon…..jaw casting.

Be stumped by the “mystery gate” (they eventually figured it out).

See how you measure up to he world’s tallest man.

You don’t want to miss these two great exhibits at the Discovery Science Center this October (both included in regular museum admission).  Find out more details HERE.

My children and I received a preview of The Discovery Science Center’s Spooky Science and The Science of Ripley’s Believe it or Not exhibits.  All opinions in the post are my own.

Share

{ Comments on this entry are closed }