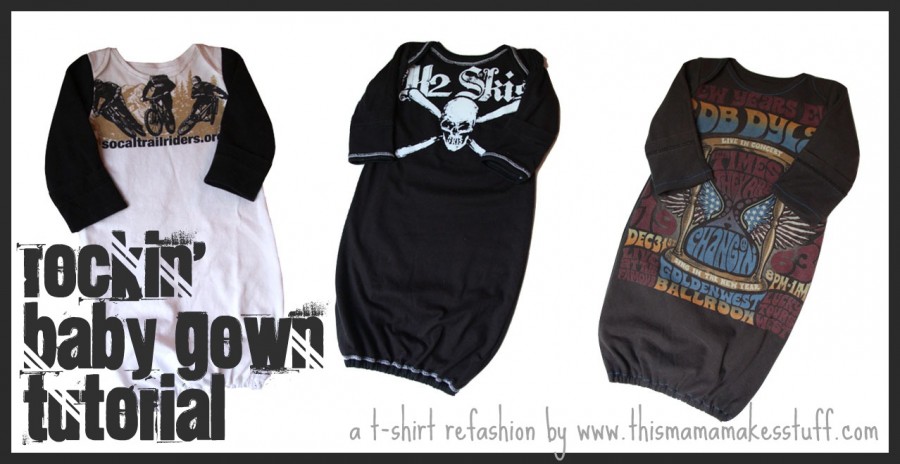
Tutorial: Rockin’ Baby Gown {t-shirt refashion}
Supplies:
Large t-shirt, sewing machine, iron, rib knit (optional)
Follow instructions to put your pattern together & read through the picture tutorial before you start cutting. There is a neck hem variation you might want to try! I would suggest making your first gown out of a shirt that isn’t your favorite. Sewing on knit can be a little tricky and hemming the curved neck edge takes some practice, but you’ll get the hang of it.
Remember, if your favorite shirt is too small to cut out the entire pattern, grab a contrasting shirt to make color blocked sleeves.
Now, you’re ready to sew!!
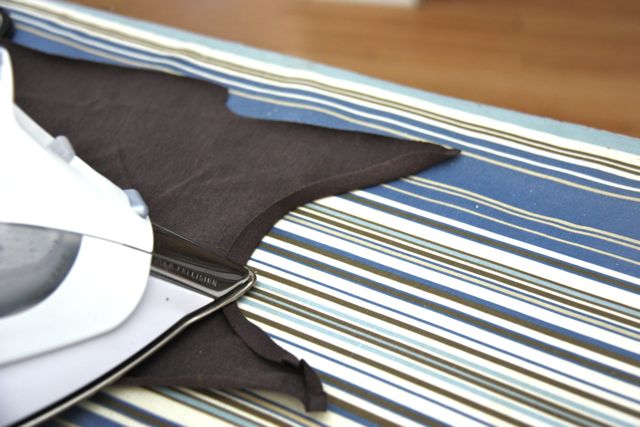 Fold and press neck edge 1/4”on front and back.
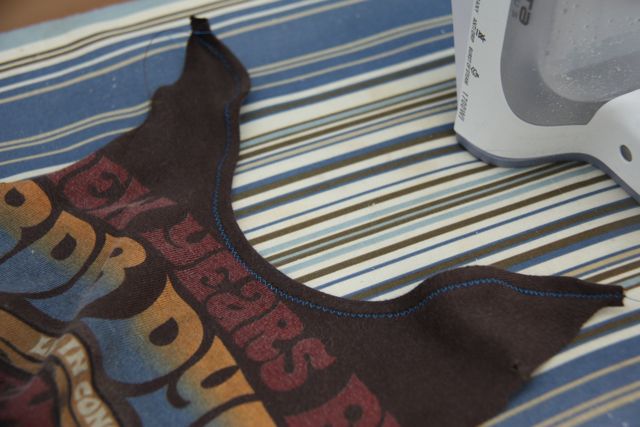 Sew folded neck edge (front and back) with zig-zag stitch. Don’t allow neck edge to stretch too much. Hem will still be a bit wavy (this step is the trickiest and can take some practice). VARIATION: Cut out pattern using the “rib knit finish” lines. Use the neck binding technique used in the “90 minute shirt Tutorial” to hem the neck edge. The contrast overlock stitching looks great (see K2 Skis gown for example).
(Neck Edge Hem Variation using rib knit binding)
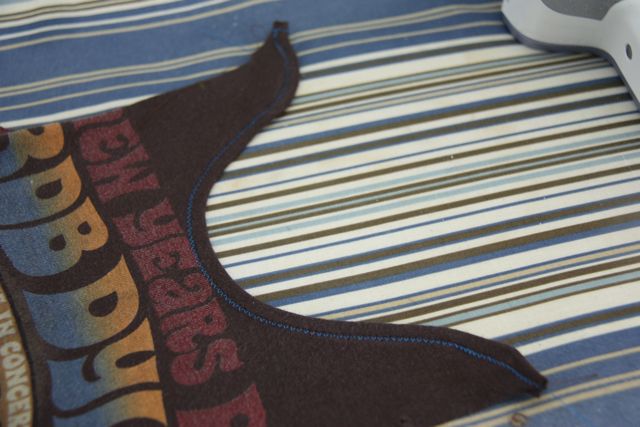 After you have finished the neck edges, press to flatten out any “waves”.
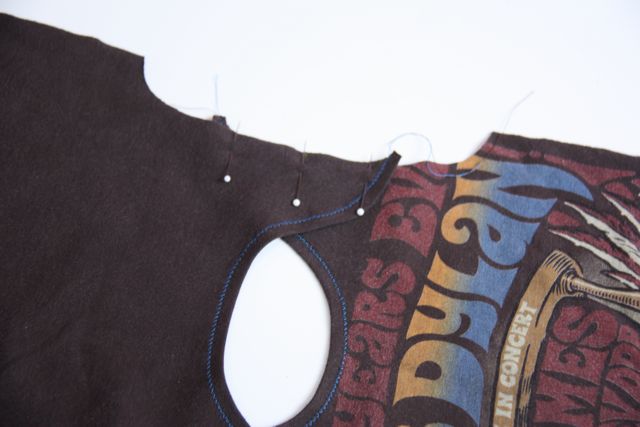 Overlap back over front at shoulders, matching marks. Machine baste to hold in place.
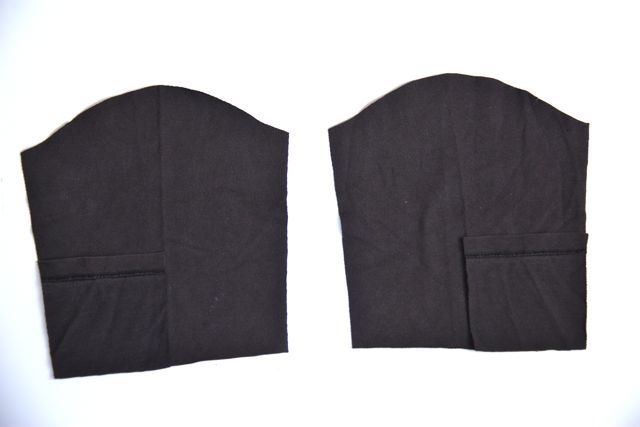 Place the flap pieces on sleeve pieces, right sides together as shown in the picture.
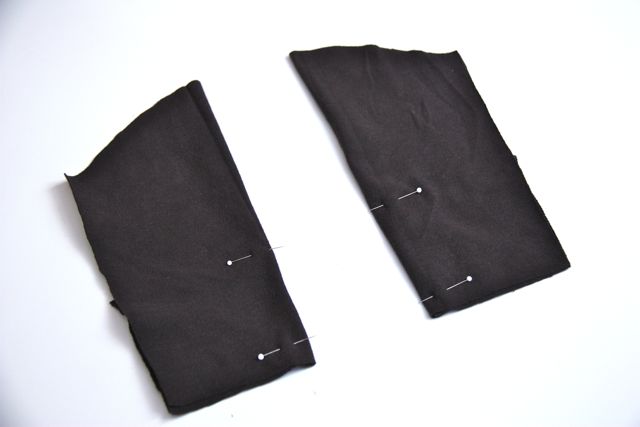 Fold sleeve in half and pin flap now “sandwiched” into sleeve.
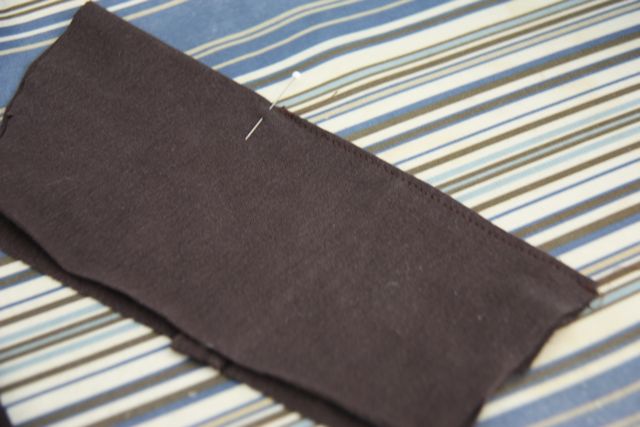 Starting at sleeve edge, sew >1/8″ seam (making sure to catch flap edge inside sleeve) gradually running off folded edge at mark
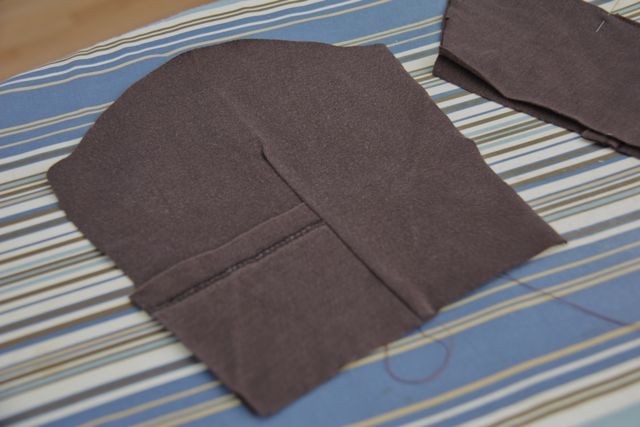 Open sleeves and press flap toward back half of sleeve.
 With right sides together, sew in sleeves.
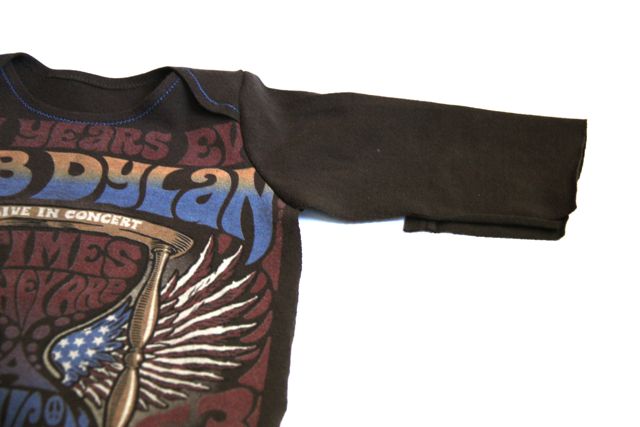 Flap should be facing the back and look inside out when not in use.
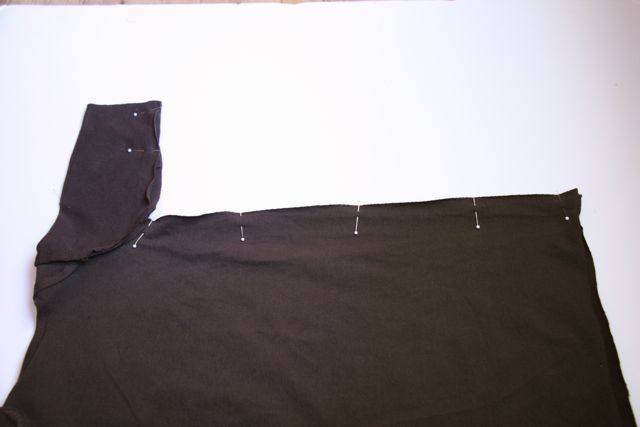 With right sides together, sew side seams from underarm through bottom of gown, making sure flaps are on the back half of the sleeve.
Press 1/2″ hem on sleeves (unless you have cut sleeves using existing hem of shirt).
Sew hem on bottom of gown leaving a 1” open space. Insert 14” piece of soft stretch elastic (from 1/8” wide to 3/8” wide). Sew ends of elastic together and close up hem opening.
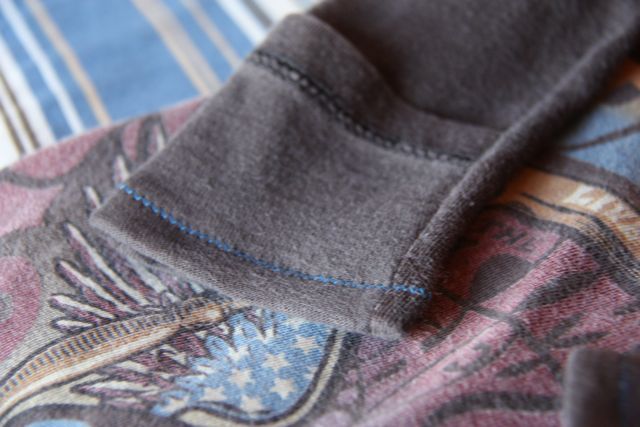 Sew hem into sleeves (flap will be hemmed with the back sleeve)
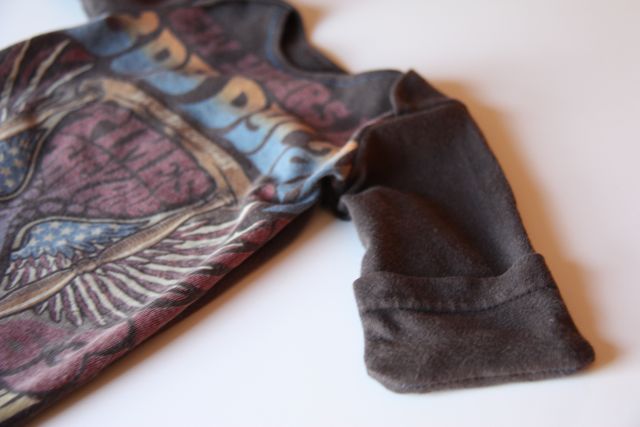 Flip the flap over the front of the sleeve to cover baby’s little hands.
You’re all finished!
This tutorial & the project created is for personal use only & not for commercial use.





{ 1 trackback }
{ 39 comments… read them below or add one }
Wow, looks fabulous! Thank you for the tute!
[Reply]
Thanks for updating this post! I tried so many different ways to add those hand flaps and my head nearly exploded… this makes so much more sense!
[Reply]
yay! i still have plenty of time to sew some of these up before my little no. 3 arrives. thank you!
[Reply]
How lovely!
I have a friend expecting her first little one on New Year’s Eve. What better gift for a precious newborn? Many thanks for sharing.
[Reply]
Oh my goodness. My baby hunger just went through the roof. SO CUTE!!! I can’t wait to make these!
[Reply]
I totally love this tutorial! I made a test one from an undershirt but it turned out so great I dyed it and am putting the final result on my blog! Also, how did you get the neck part to turn under for hemming without clipping the rounded parts? I had to do that for mine. I also don’t have a serger so the inside isn’t fantastic but I figured it didn’t matter too much! Thanks for the tut!
[Reply]
This is Carrie
Twitter: thisiscarrie
Reply:
August 14th, 2011 at 9:18 pm
That’s awesome! I love it when the trial run turns out great. I never have had to clip the rounded parts. I am really careful about easing the excess fabric in while I sew. It might also depend on the weight of the t-shirt you use. I have a serger but I never use it on my little gowns. Knit doesn’t need it because it doesn’t fray, although when you do use an overlock stitch on the seams, it makes it look more “finished”. But I love the “homemade” look myself. Good luck with the next one!
[Reply]
Great job!!!!! Great gift idea!!! Good job on the hand flaps!!! 🙂
Thank you.
Louise
Slave To My Needles
[Reply]
This is Carrie
Twitter: thisiscarrie
Reply:
August 14th, 2011 at 9:05 pm
Thanks Louise! Glad you like the hand flaps!
[Reply]
I love this idea and that baby is soooo sweet. Cant wait to make this.
[Reply]
I’ve been wanting to do this for a long time, but your tutorial finally got me going! Thanks much. 🙂 I wrote about it on my blog too…
http://thehenryhomestead.blogspot.com/2011/08/newborn-sleeper-from-tshirt.html
[Reply]
This is Carrie
Twitter: thisiscarrie
Reply:
August 29th, 2011 at 8:20 am
I’m so glad you tried it! You’re little gown turned out great!
[Reply]
Looks like an interesting tutorial! I am planning on using the pattern with my Girl Guide unit so that we can make some of the gowns as a service project for a local women’s shelter. I am wondering if the pattern can be altered a bit to leave the neck of the shirt as it is and just cut a bit off of the sleeves and torso (leaving the original shoulders and neck hole intact) so that we don’t have to try to sew shoulders. Has anyone tried this?
[Reply]
I want to make this as a gift for a one month old baby (who is wearing size 3 month clothes). Do you expect this pattern size to work for him as well? If not, is it as simple as adding an inch or so all around??
[Reply]
This is Carrie
Twitter: thisiscarrie
Reply:
November 9th, 2011 at 9:31 pm
You’ll definitely need to add length and a little width. Maybe some length on the sleeves. The neck/head opening should be fine.
[Reply]
Newbie question from someone expecting her first child in the spring: what are the hand flaps for? So the baby’s hands don’t get cold, or so he doesn’t scratch himself accidentally? Thank you!
[Reply]
This is Carrie
Twitter: thisiscarrie
Reply:
January 3rd, 2012 at 7:08 pm
Depending on where you live, the flaps can definitely be used to keep the babies hands warm, I like them so the baby doesn’t scratch him/herself. And I thought gowns were weird (especially for baby boys) before I actually had a baby and had to do numerous diaper changes in the middle of the night. When you are delirious from sleep deprivation, tons of tiny little snaps make you want to cry. Elastic bottom gowns are THE BEST! Congrats on the new arrival!!
[Reply]
camille Reply:
January 4th, 2012 at 1:53 am
Thanks a lot for the clarification and added details! And my best wishes to you for the new year.
[Reply]
thank you for this tutorial. i have been struggling with the neck flaps for weeks and my granddaughter arrived dec 23 and now i can do this. the t-shirt idea is a really cool idea. i was just using knit baby fabric but i have lots of grandma t shirts that i would love to share with my new Mia Jane. thanks again.
[Reply]
Thank you for posting this tutorial! I am expecting my first baby in April and I decided it was finally time for me to learn to sew, so I got an old second-hand machine and decided this gown would be my first project. I’ve made two so far and other than a slight mistake on the hand flaps (one is on the front and one is in the back), they’ve come out great! I plan to make more as I plan to do EC (elimination communication) with my baby so I’m trying to avoid the snappy onesies as much as possible.
[Reply]
These open bottom sleepers are my favorite for quick night time diaper changes. Brilliant idea to upcycle cool t-shirts! Now wish I could find time to make some for my newborn!!!
[Reply]
I found you on pinterest… I have made 3 so far as baby gifts out of up-cycled surf T’s, and they were a hit at the shower! Thanks for this amazing tutorial.
[Reply]
Love Love Love it! My girls and I took a bunch of “old” tees and made these super cute gowns for the local Newborns in Need. We now make about one a week and use the sleeves to make little hats. Thank you so much for the inspiration and tutorial. You have touched and helped little lives with this.
[Reply]
I linked to this post on my blog:
http://creativitybynecessity.blogspot.com/2012/02/make-your-own-baby-layette.html
Thank you so much for sharing! I used a thrifted knit sheet, and it worked beautifully, and fit my newborn perfectly.
[Reply]
If I were going to buy fabric how much fabric would I need to complete one gown. Any suggestions would help..
[Reply]
This is Carrie
Twitter: thisiscarrie
Reply:
February 21st, 2012 at 3:09 pm
knit fabric is usually very wide (60″) which means you shouldnt need more than 1/2 yard.
[Reply]
Great.. Thank you for your help..
[Reply]
Almost done. Doing the hemming now.
I definitely will be asking my daughter and son-in-law for their vintage tee shirts…so I can make “Sweet Pea” sleepers for their upcoming arrival!
Hint: When the baby gets too long, the gown may still fit its torso so pull out the elastic and extend its use!
[Reply]
How many inches wide should the chest and back be? also how many inches in length for the arms from shoulder to wrist? I just started cutting the knit material and laid out the cut pieces they seam so small. I thought i might have cut the pattern wrong. Maybe it’s just because my kids are 17 an 10. I thought it looked small and it will get even smaller when I sew it. Can you please help????
[Reply]
Your FIRST gown will probably be for a newborn. Next, time follow this plan:
When you place the front and back pieces ON THE FOLD, move the pattern (for instance, try 1/2 an inch) away from the fold line. Make it the same distance for each piece. That way, you will have a bigger torso for the gown.
If you add 1/2 inch (on the fold), it will actually be one inch more for the front and one inch more for the back.
You can use the same process for the sleeve except you will need to cut along what would be the fold line and add more distance.
You may add whatever etra length you please. I had babies that were long and chubby, so the true newborn size probably would only work for one wearing.
Hope this makes sense!
[Reply]
It does thank you very much for your help…
[Reply]
I made this gown today it is so cute and easy, but I did sew one flap backwards. thanks for the Tut.
[Reply]
Do you happen to sell these by any chance? I am not a sewer 🙁 Let me know! These are adorable!
[Reply]
Not me but print off the directions and pattern. Stuff it into an envelope and carry around in your car. Some day…you will come across someone who will take it on. Try asking someone who is a “grandma” age and sews….
[Reply]
Hi, can this pattern be used to make gowns for older babies? Is it as simple as adding an inch or so all over? I am putting my 4 month daughter in gowns now but I haven’t been able to find any for 6 months+. It’s been a good few years since I last broke out the sewing machine, but I love the ease of gowns for nappy changes (and they look so cute!) so really keen to make some for her for when she grows out of the current ones! Any help greatly appreciated
[Reply]
Gernerally, they are for newborn age. When I had my children (30+ years ago), we would just pull the string (now elastic) from the bottom edge and allow the kiddie to continue wearing it. When your child starts to climb/stand on his/her own, then it may not be as workable. Yes, they are GREAT for nighttime diaper changes.
Suggestion as to how to adjust the pattern: Add at the center fold. If you put an extra half inch there, the front would be an inch wider as well as the back. Therefore, it would be two inches bigger around. It would be advisable to increase the width of the sleeve also. Add more length. I would suggest that you use a regular sleeper and/or a tee shirt as a guideline for your.
I had not had my sewing machine out in years. Just graduated to making a “sleeper bag” complete with a zipper. Used fleece I found as a remnant. Think the pattern was by Simplicity.
Hope this helps.
[Reply]
Penny Reply:
March 27th, 2012 at 11:42 am
Thats great, thanks very much for the advice! 🙂
[Reply]
I absolutely LOVE this idea! I’m a scrap quilter, and I’ve recycled clothing into quilts. Well now I have something new to do with old T-shirts that have too cute designs. My SIL is expecting, and needs an entire baby wardrobe, blankets, crib bedding, and so much more. Her husband recently lost his job and her pregnancy is high risk. If all goes well, we will be welcoming my niece in June. My SIL loves baby gowns, and I’m wondering if there would be a way to make a short sleeved version of this gown since the baby will be a summer baby and we live in Florida. A short sleeved version, I think, would be nice when she takes the baby outside for family gatherings and reunions. We seem to have a lot of “back yard days” during the summer and early fall in our family.
[Reply]
Well, I have since made a short sleeve version. Just moved the sleeve pattern down the adult tee shirt sleeve line so I could use the actual sleeve edging for the baby sleeve edging. Looked adorable!
[Reply]
So, two things. I have never sewn any kind of clothing before attempting this one and I had to use kids shirts which left me piecing fabric together. It’s not perfect. Also, I couldn’t print the pattern so I had to do the best trace job that I could and wing it. All in all I would make the neckline a little smaller as I’m afraid this is going to be too big for a newborn but since I didn’t print the pattern I’m not even going to begin to blame the pattern! I will definitely know what to tweak on the next one. It was very simple to make and as a first-timer it took me about two hours. I’m happy with it!
[Reply]
This is Carrie
Twitter: thisiscarrie
Reply:
May 22nd, 2012 at 10:26 am
Lightweight and flimsy knits can be especially hard to sew. Some machines can handle it better than others as well. Look for thicker knits and rely on your iron to press and form the hem around the curves before sewing. I hope this helps! Practice, practice practice!
[Reply]
Oh and here’s a link to my finished product.
http://imageshack.us/photo/my-images/864/sleepgown.jpg/
[Reply]
This has got to be the cutest, best baby idea I have ever seen! Thanks for sharing. It’s a good thing my sister is pregnant, otherwise I’d have to have another baby just so I’d have a reason to make these!!
[Reply]
Just a suggestion that I found easier. I sewed the hem on the sleeves before I stitched the sleeves and sides together. It is a lot easier to do it this way then to try to turn that tight of a circle.
LOVED this Pattern and did it fairly quickly on the 1st time. Plan to make more.
[Reply]
This is Carrie
Twitter: thisiscarrie
Reply:
May 26th, 2012 at 1:50 pm
Deidra, that is definitely one way to do it. I prefer the finish on the sleeve when it is hemmed after the sleeves are sewn up, but it is a little hard to do that way.
[Reply]
Made mine out of one of son-in-law’s favorite hockey team’s T-shirts. Turned out so cute, and used the leftover short sleeves of the T to make a baby beanie.
Thanks for sharing.
[Reply]
Just want to make a comment…not about the tee shirt gown. I found a vintage bassinet for my daughter. It was in pristine condition and even had the original mattress and liner. Ironically, the company that made it was online and still in business so I found it out it was 50 years old. Made a little flannel liner with a ruffled edging. So cute!!!
Also, getting ready for the state fair and deciding what to enter. Last year, I took a set of store bought receiving blankets and crocheted edges on each to reflect the blanket pattern. Got a 4th place ribbon! Had never entered anything before so I was thrilled. Thinking I will upgrade and put crocheted lacy edging on some little white onesies….
[Reply]
I just made one of these, and it turned out great, except that is it HUGE. the length is fine, since I just measured the 14 inches… but the width is WAY bigger than any of the other newborn size clothes I have. It’s even a lot wider than the 3-6 month clothes I have. Did I do something wrong? I printed it out with the scale set to 100%. I didn’t add any seam allowances… I can’t think of what I did wrong!
Is meant to be very baggy? Please help!!!
[Reply]
It will be just fine. When your child gets older, you can remove the elastic and have a little nightie to walk around in…. Besides, babies don’t wear the newborn items very long. You will not be disappointed during the night while having to do a “quick change” diaper and you are mostly asleep.
[Reply]