Sewing Summit 2012 {a recap}

by This is Carrie on November 10, 2012

There’s a big, selfish part of me that doesn’t want to give Sewing Summit anymore publicity because I want/need/have to go next year and tickets are super hard to come by already. I guess I could tell you it wasn’t that great, but that would be a HUGE lie.  I spent 3 days thrifting, friending, sewing, learning, networking, and eating.   For me, someone who loves all those things, it was weekend of pure awesome.


The trip started off with a thrift/antique/vintage store hop I co-hosted with the talented Melissa of I Still Love You.  She did most of the work by putting together a fab shopping route around downtown Salt Lake City (if you visit, you should use her map to hit some fun shops).

Maria, Lisa, Heather, Melissa, Katie, Veronica and Me

I met some of my favorite people from the whole weekend on that shopping trip.  Katie, the second girl over from me in the photo made her ENTIRE outfit including the red skinny jeans.  You COULD NOT tell the difference between them and store bought.  She’s my garment sewing hero. Heather and I connected immediately with our similar background in the fashion industry.  We actually worked for competing companies at the very same time.  The company she worked for rhymes with Gildren’s Space.

?, Mia, Tiffany, Me, ?, Miranda (totally drawing a blank on some names -please help me out if you can identify these two girls!)

Early friday morning, I took out a small group of attendees on a 5K fun run through downtown SLC.  When it’s 6am, you know who the die-hards are. I rewarded one lucky runner/sewist with a prize package donated by Another Mother Runner, Nuun, & Team Sparkle. Then we all rewarded ourselves with french toast at the hotel coffee shop as we bonded over our mutual love of running & sewing.

photo via Andrea from The Train to Crazy (one of my new BSF’s – best sewing friends)

I’m so glad I got to teach my “Down and Dirty Patternmaking Skills for Childrenswear” class on Friday afterrnoon.  Otherwise, I would have had a tight knot in my stomach the entire weekend.  It’s stressful to take a subject that deserves a few semesters of hands-on classes and try to teach it a two hour lecture format, making sure everyone (with their varied backgrounds and experience) understands the content and learns something from the class. I think it went well, but after it was over, I was itching to do a “hands-on” Down and Dirty Patternmaking for Childrenswear class.  Sewing Summit 2013 perhaps?

Someday, I might post a synopsis of the class content. For now, if patternmaking interests you, follow these two boards on Pinterest:

Childrenswear Patternmaking-Sewing Summit (I’ve put links to all the supplies & books I referenced in the class as well as some online tutorials).

Pattern Practice (as I come across interesting styles, I’ll pin them here for “pattern practice”).

The classes I took at Sewing Summit were awesome. I loved rubbing elbows with women who are talented, inspiring and willing to share their expertise.

I learned how to quilt with Amy Ellis from Amy’s Creative Side.  I practiced my pockets with Deborah Moebes from Whipstitch Fabrics (I was also lucky enough to be Deborah’s roomie – keep your eye out for her new book).  I soaked up all sorts of sewing tricks and tips for special occassion sewing from Sarai Mitnick from Colette Patterns, and I whipped out a couple maxi skirts on a drool-worthy Baby Lock serger with Leanne Barlow from Elle Apparel.

My favorite part of Sewing Summit might have been the late night sewing in the rooms filled with Baby Lock sewing machines and Olfa cutting tools.  It felt like a college dorm (complete with pj pants, candy and giggling) but sewing was the late-night activity of choice. I knocked out a couple projects I’ve been wanted to tackle for FOREVER and did it among a group of people who appreciated the delicacy of a perfect placket and the satisfaction of a well-pieced quilt.

At the end of it all, Sewing Summit 2012 was an amazing, relaxing, inspiring weekend full of networking, sewing, running, and eating. It was a weekend I totally needed and will look forward to in 2013.

Share

{ Comments on this entry are closed }

Our Halloween 2012

by This is Carrie on November 2, 2012

The Baby used his first sentence, “More Candy” at Todd’s office party.

The Hulk got into a tussle with “the scary guy from Scream” in the office “Spook Alley”. The Hulk threw the first punch. The Scream guy was just trying to defend himself.

The Fab Five were together again thanks to all the girls on the cul de sac joining in on our Olympic costume fun.

Thanks to the internets, my guacamole display was the hit of the neighborhood Halloween party.

We brought back the Mighty Mouse costume Pumpkin wore when she was 3 years old (after I ripped off the girly sequin trim).  The Baby loved it more than his Olympic swimmer costume.

I was totally impressed by the kids’ pumpkin carving.

Happy Halloween 2012!

Share

{ Comments on this entry are closed }

Making Stuff: Olympic Family Costumes {Halloween 2012}

by This is Carrie on November 2, 2012

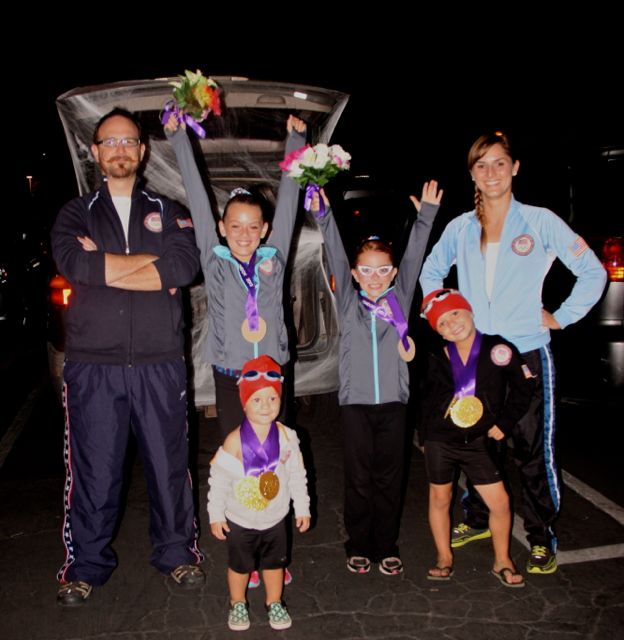
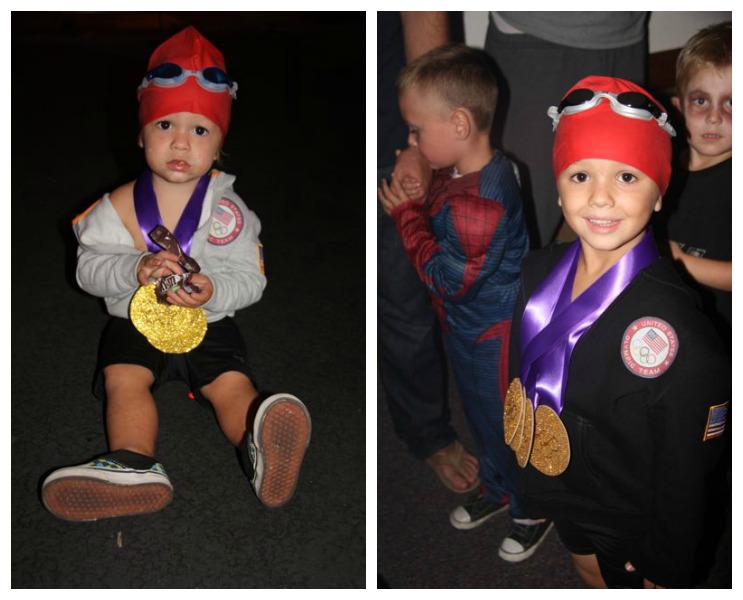
We went with an Olympic family costume theme for the church Trunk or Treat.  The girls were Olympic gymnasts, McKayala Maroney and Gabby Douglas. The boys were Olympic swimmers, Michael Phelps and Ryan Lochte. Todd and I were Olympic coaches in our spruced up warm up suits from the thrift store.

It was easy to pull together the boys costumes using bike shorts as Speedo swim trunks and accessories pulled out of my swim bag.  The same tutorial worked for the girls Olympic gymnast jackets and for the boys’ warm up hoodies. The gold medals were the same too, I just had to make a whole lot more of them.  My only regret is that I couldn’t find a 4 year old appropriate, blinged out grill for our little “Ryan Lochte” to wear.

Share

{ Comments on this entry are closed }

Making Stuff: The Hulk Muscle Shirt {Halloween 2012}

by This is Carrie on November 1, 2012

Big Brother was great to play along with our family Olympic theme for the church Halloween party, but for “real Halloween” he wanted to be the Incredible Hulk. I was about to buy a pre-made Hulk costume when I came across this tutorial for a DIY muscle shirt costume.

I decided to give it a shot.

If I were to do it again, I’d cut the neck smaller (my green fabric was super stretchy) and I’d make some muscle leggings to go along with it.  But otherwise, I was pretty happy with it.  Big Brother on the other hand thought I was “The best mom ever” for creating this transformative costume of his dreams.  I may have made it for Halloween, but this costume will get worn all year round.

Share

{ Comments on this entry are closed }

Creating Together & Playing Together

by This is Carrie on October 29, 2012

I believe two of the keys to a having a happy family are:

Creating Together & Playing Together

Finding something to create together and play together can be a challenge when families are made up of people of different ages with different interests.  Every once in a while, you can find something that will appeal to all ages, genders, and interests.  These are the activities you hold onto.  That’s why our family invests in bikes. That’s why I posted this game a few days ago. That’s why art supplies are always stocked and ready for use.

Little did I know, the Lego Crazy Action Contraptions Book (originally chosen by my 4yo son as part of my Klutz Brand Ambassadorship) would turn out to be one of those rare. mass appeal, family togetherness activities.  We built, we played, we laughed, we shared, we created together as family of six (kids ages 2-10) without one argument.  It was pretty much a miracle.

To learn more, you can like Klutz on Facebook or visit Klutz.com to browse all their fun titles which are now packaged in easier to wrap shapes.

If you love Klutz as much as we do, enter the Wrap It Up With Klutz! Sweepstakes every week until November 26th for a chance to win some prizes too! Ten winners each week win 10 Klutz Titles!

Disclosure: I’m thrilled to be a Klutz Books Ambassador for this holiday season. I’ve been a Klutz fan since I was a kid when I got my first Klutz book about games you can play with a Koosh Ball. Yes, I’m that old.  I’ve bought numerous Klutz books for my kids and others over the years. They are definitely my “go to” birthday & holiday gift. While I received compensation as well as a gift or sample of a Klutz product for consideration in preparing to write this content, all thoughts and opinions are my own.  I assure you my undying love and adoration for the Klutz brand was not bought, it was cultivated over 20 years of great and real experiences with the company.

Share

{ Comments on this entry are closed }

How to Prepare for a RunDisney Race

by This is Carrie on October 28, 2012

photo credit: Angry Julie Monday

Step 1: Hang out (or in our case work) at the expo wearing 3 Sparkle Athletic running costumes in 2 days to properly absorb the true spirit of a RunDisney race.

Step 2: On the night before the race, finish up running costume #4 (the actual costume for the race) in the hotel. Be sure to pack the scissors and glue!

Step 3: Head out to The Park for a carb-loading dinner….in a running costume.

Step 4: Since you’re already in the park, you might as well go on a ride…..

….or two.

Step 5. Finally head back to the hotel to sleep before the clock strikes twelve and your chariot turns to a pumpkin, your horses turn to mice and your projected half marathon time goes completely down the toilet.

Step 6: Do it all with your BRF’s (best running friends).

Share

{ Comments on this entry are closed }

While the Crazy Candy Whacking Game is a great birthday party game, I have the most fond memories playing it with my family during Family Home Evening.  Kids obviously love it, but it’s an awesome game for teenagers and adults alike, always ending in tons of laughter.  It’s a fun game for a family of 3 all the way up to a family of 20 (although there is more chance for injury especially when your family is as competitive as mine).  You can play it outside or inside (assuming you have an open space large enough).  And for everyone enjoying their first snow, you definitely don’t have to play in swimsuits.

Just last week, I taught all the neighborhood kids the Crazy Candy Whacking game and it was just as much fun as I remembered. Even some of the neighborhood adults had to get in on the action.  I’m telling you, this game appeals to EVERYONE.

How to Play the Crazy Candy Whacking Game

Supplies: chair, candy, a few pieces of rolled up paper (newspaper is best, we used some butcher paper),  blindfold.

Objective: grab as much candy as you can without getting whacked.

-Pick someone to be “It”. Have them sit in the chair. Blindfold & hand them the rolled up newspaper (aka “The Whacker”). If you are worried, getting hit with a few pieces of rolled up newspaper does not hurt at all.  With 12 kids ages 4-40, we had no tears in 10 rounds of game play.

-Place a handful of candy under the chair.

-When someone says “go”, everyone tries to grab the candy from under the chair without getting hit.  The person sitting on the chair wildly swings The Whacker around, trying to hit everyone trying to steal the candy.  They may not get off the chair.

-When someone gets hit, they are “out” and cannot try to grab anymore candy (for a variation of the game, you can also have them return whatever candy they grabbed).

– You can set a time limit for each round or continue to play until the candy is gone.

-When the round is over, pick a new “It” and start over again!

-Depending on the number of kids you have playing, you might need to assign an adult referee to make sure the rules are being followed

Share

{ Comments on this entry are closed }

The Most Awesome “New” Glasses Ever

by This is Carrie on October 23, 2012

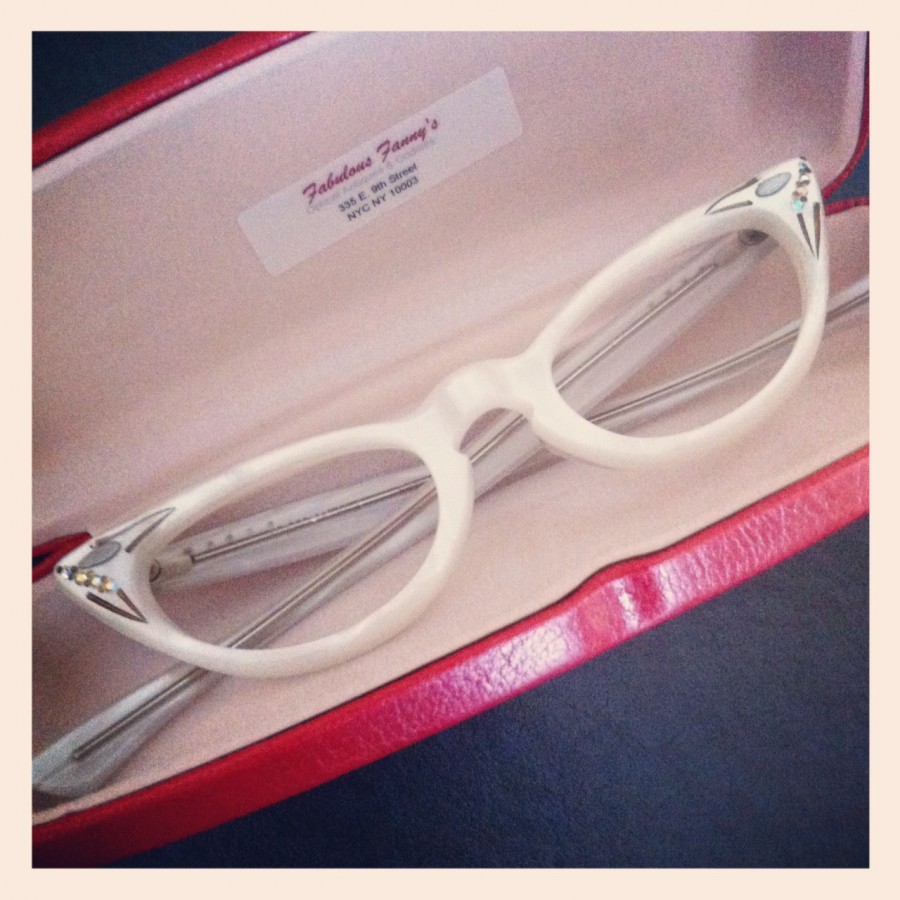
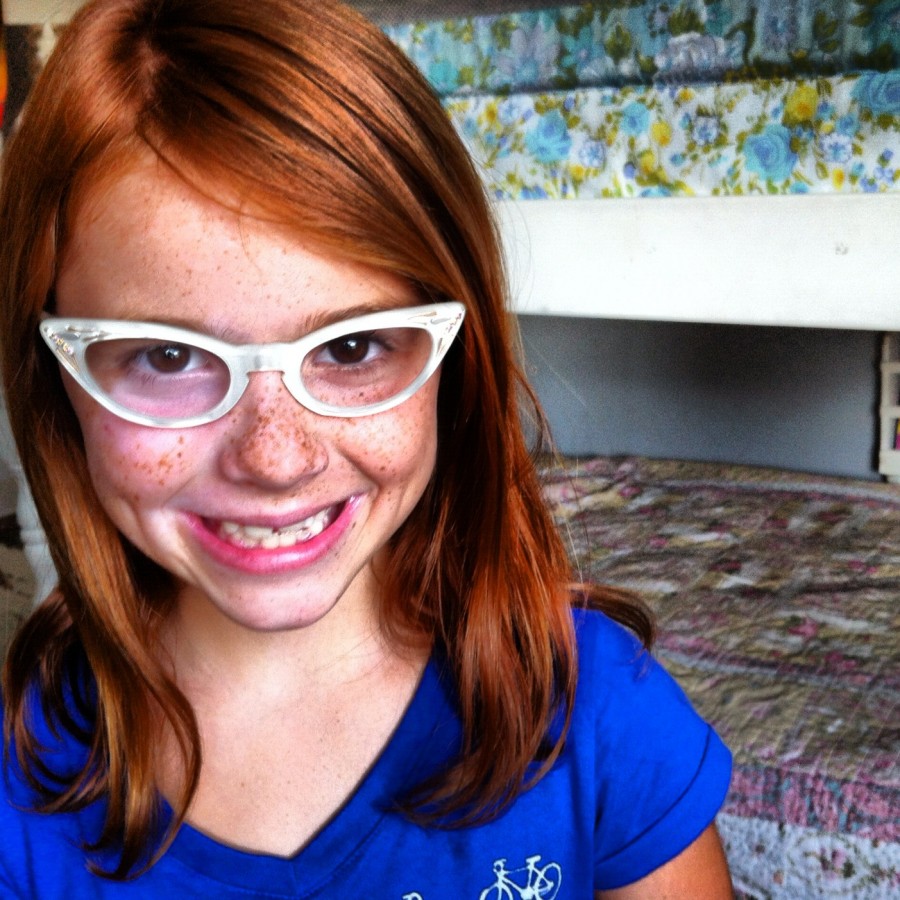
I picked up some pretty cool things on my solo trip to NYC back in August (I’ll have to post about that trip someday), but my best find every was a pair vintage eyeglass frames for Pumpkin.  Ever since she started wearing glasses, I’ve tried to treat them like an awesome accessory instead of a vision necessity.  I do believe it’s made all the difference for my (once reluctant) girl with glasses.

Where does one find such cool, vintage eyeglass frames? My NYC BFF, and queen of cool frames, took me to Fabulous Fannies in the East Village.  Their motto is “if you have to wear ’em, make it fun”.  Perfect.

(A local optometrist can have the prescription lenses put in)

Share

{ Comments on this entry are closed }

Scary Stylin’ Barbies Tutorial {DIY Halloween Home Decor}

by This is Carrie on October 16, 2012

We’ve been fans of Savers “Dolls of the Living Dead” Halloween decor project for years.  When I came across these two Barbie Hairstyling heads at my last trip to Savers Thrift store, I knew I could use a similar technique to turn them into creepy Halloween decor perfect for the porch garden box or fireplace mantle.

Supplies

Old Hairstyling Doll Heads (I found mine at Savers thrift store)

White spray paint for plastic

Large red rhinestones or sequins

Decorative creepy, crawly critters (found these at Savers too in their “new” Halloween section)

Black Sharpie marker

Optional: Black Spray paint.

Spray your dolls with white spray paint.  Allow to dry before flipping over to do the back. Spray the hair too, styling as you go and using the spray paint to “hold” the hair like a super strong hairspray.  I had some leftover black spray paint from my Sinister Ceramics, so I used it to “stripe” the hair for a “Bride of Frankenstein” look.

The kids love to get involved in this next part.

Weave spiders, snakes and other creepy, crawly creatures into the hair.  Use a glue gun to attach them to the skin of the doll.  Using a black sharpie, add stitch marks and color in the bodice.  Finally, glue on red sequins or rhinestones for eyes.

For more thrifted Halloween goodness, check out the video I filmed last year at my local Savers Thrift Store

DIY Halloween : This Mama Makes Stuff from Jakfoto Films on Vimeo.

disclosure

Share

{ Comments on this entry are closed }

My Thrifted #Halloween {DIY costumes & crafts}

by This is Carrie on October 5, 2012

Costuming a family of 6 for Halloween can cost a pretty penny. When I try to save money with homemade costumes, it costs me a ton of time.  These last few years I’ve found a happy combination of homemade, reused and thrifted costumes for the whole family, costing me not too much time or money.  That’s why I always begin my Halloween shopping season with a trip to my favorite thrift store, Savers. During the Halloween season, Savers has the largest selection of new and used costumes, accessories, home décor, and makeup of any other store.

I’ve been hoping to pull off an Olympic family themed Halloween since we decided on the girls Olympic Gymnast costumes.  Finding these pieced together warm up suits at Savers sealed the deal (especially the break away pants with star and stripe trim). Embellished with USA flags and “official” Olympic patches, Todd and I will make perfect gymnastic coaches.

Even though the boys already have their costumes ready (one hand-me down Mighty Mouse and one homemade Hulk), I was excited to pick up all the green Hulk makeup I needed. And I just couldn’t resist this little monster hat in the Savers “new costume”section. I know it’s quickly going to become a costume box favorite. FYI: they have adult sizes too.

Savers is also my favorite supply store for Halloween DIY decorations.  Boring knick knacks and discarded Barbies become….

Dolls of the Living Dead and Sinister Ceramics greeting trick or treaters at your door.

Money Saving Shopping Tip: Bring in a bag of donations to your local Savers store and you’ll get a 20% off coupon you can use on your in-store purchases.

disclosure:

Share

{ Comments on this entry are closed }